
About DryerNotHeating.Net
The goal of DryerNotHeating.net is to become the most thorough resource to help you fix your non heating dryer. As time progresses I will continue to add information to this site to better serve you.
Knowing how to fix your own dryer is a very valuable tool. You can save a hundred dollars or more by doing it yourself. When I began to fix my own appliances, I was amazed at how much I saved, how easy it was to fix, and why I ever hired a repair to fix my appliances.
Whether you have a gas or electric dryer that is not heating, there are a few common parts that may need to be replaced. On this page, we will give an overview of how the electric and gas dryer works. We will also cover the most common parts that fail on the dryer. Check out some of our other pages to see step-by-step tutorials on how to replace each part. I also have a growing amount of tutorials dedicated to specific styles/brands of dryers. See my tutorial list below:
How The Electric Dryer Works
Not all dryers look the same, but they all operate in the same manner. The 3 factors that are the same in every dryer through a combo of 3 main factors.
- air flow
- heat
- drum rotation
If your clothes aren’t drying it is because of one of the 3 factors above.
When in operation, your dryer has a blower wheel in the front or rear of your appliance. The dryer uses a blower wheel to circulate the heat. The air is heated and circulates through the clothes as the drum rotates. The hotter the air, the more effective it is to remove the moisture from the clothes. Average dry times are about 60 minutes.
For electric dryers, the air is heated by a heating element while a gas dryer uses valve coils to allow gas to pass by the igniter, which ignites the gas. As with any dryer, air flow is needed in order for the clothes to dry correctly. Making sure that there is sufficient room behind the dryer so the venting is not smashed helps. Also using rigid or semi-rigid venting is ideal to help ensure that your venting doesn’t get easily clogged with lint. It is a good idea to clean your dryer vents once a year.
The image below show 3 types of dryer venting. Rigid venting is most efficient. Semi-rigid is slightly less efficient, but easier to work with. But whatever you do, don’t go with the shinny, thin, plastic feeling venting. This type of venting can easily cause your vent to get clogged, not allowing your dryer to properly dry your clothes. It is also known to cause fires.
Dryer Venting- the vent on the left is rigid venting while the vent on the right is semi-rigid venting.
If there isn’t proper air flow, the high limit thermostat will heat up due to over heating and then switch off the voltage to the heating element or valve coils. The thermostat will reset after it cools and the process will repeat itself resulting in long dry times.
Some models may have a thermal fuse on the blower housing and a thermal cut-off fuse on the heater housing. Either of these fuses can fail causing the dryer not to heat or not work at all.
Thermal cut off
Thermal fuse and cycling thermostat
The most common electric dryer parts that fail
The most common parts on an electric dryer that fail causing little or no heat are listed below. 80 – 90% of the time that I fix a a non heating dryer it is caused by one or more of the parts below and/or lint build up. The great news is these parts are also the least expensive parts in the heating circuit. Your dryer may not use these exact parts shown. Be sure, enter your model number below to find the correct part that comes with a 365 day warranty.
Be sure to unplug your dryer before attempting any repair!

Heating Element – When the heating element goes out on an electric dryer, there is no heat. Many times when you inspect the element, you will see a visual break in it. Sometimes a visual break can’t be seen. A continuity test will let you know if the element is good or bad. Also be aware that sometimes one of the coils are being grounded out to the frame of the element making it appear that there is continuity. With the power turned off, place one probe from your ohm meter on one terminal and the other probe on the frame of the element, if you are getting continuity, the element needs to be replaced. Heating elements come in different shapes and sizes. To search for the correct heating element for your dryer, it is best to do a model number search. Click the links below for more helpful information or enter your model number in the search box to find the correct part for you dryer.
How to test/replace heating Element – How to find model number
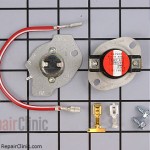
Thermal Cut-Off Kit – When your thermal cutoff blows, it is common to replace both the thermostat and the cut-off. (Sometimes the cause of the thermal cutoff blowing is because the thermostat is faulty allowing the dryer to heat beyond what it is specified.) This kit comes in handy and is usually cheaper than buying the parts separately. Be sure to clean out lint both inside the dryer and in the venting.
How to test/replace thermal cut-off – How to find model number
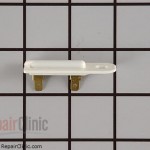
Thermal Fuse – With many electric dryers, if the thermal fuse goes out, it will result in a completely dead dryer. Be sure to clean out lint both inside the dryer and in the venting. Clogged venting is usually the cause of a blown thermal fuse.
How to test/replace thermal fuse – How to find model number
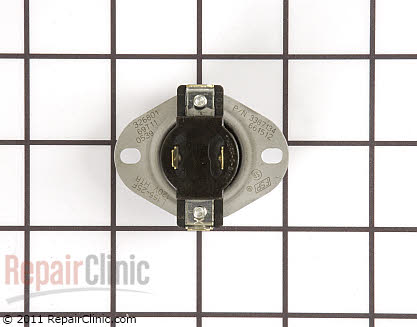
Cycling Thermostat/Operating Thermostat – The cycling thermostat isn’t as likely to go out as the above parts, but should still be tested for continuity. If your cycling thermostat has gone out, it could either be causing your dryer to to over heat or not produce enough heat.
How to test/replace thermostat – How to find model number
Make sure you order the right part for you dryer!
Find Your Part Number

How to Troubleshoot a Whirlpool Gas Dryer That Doesn’t Heat
The most common gas dryer parts that fail
The most common parts on a gas dryer that fail causing little or no heat are the following:
- Valve Coils
- Thermal Fuse
- Igniter
- Flame sensor/switch
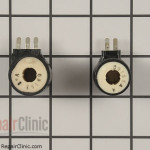
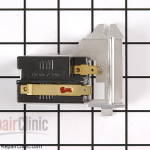
Valve Coils – Gas dryers use a set of solenoids also known as valve coils to open up the gas valve when the flame sensor/switch signals that the igniter is hot enough to ignite the gas. Failing valve coils can be temperamental at times. They can work for a while and then close prematurely causing your dryer to take longer to heat. When I repair gas dryers, I always replace the valve coils since they are one of the first parts to fail on a dryer. Many gas dryers have a small peek hole in the front of the dryer. You can pry the peek hole open and watch the igniter and valve coils go to work. Set your dryer on a heating cycle and turn it on. If the igniter clicks and glows orange but the gas doesn’t ignite, check the flame sensor/switch for continuity. If you have continuity, replace the valve coils. Find your valve coils below by entering your dryer’s model number:
How to test/replace valve coils – How to find model number
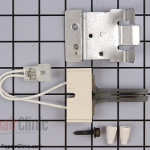
Igniter –If the igniter on your gas dryer fails to glow orange when you start the dryer in a heating cycle, first check the thermal fuse located on either the back of your dryer or on your blower housing. If the thermal fuse doesn’t have continuity, replace it and clean out the inside of your dryer between the blower housing and the lint screen. Also clean and check your dryer venting for blockage. If your thermal fuse is good, open up your dryer and test the igniter for continuity. If the igniter doesn’t have continuity, it needs to be replaced. Enter your model number below to find the right igniter for your dryer or click the links below for more information.
How to test/replace igniter – How to find model number
Thermal Fuse – For gas dryers, if the thermal fuse goes out, the igniter won’t glow causing the flame sensor to not sense the heat from the igniter which in turn doesn’t signal the valve coils to open which means you get no heat at all. A bad thermal fuse is usually caused by lint build up inside the venting system within the dyrer and sometimes outside the dryer. Clean out your dryer and venting system before replacing the thermal fuse or you will be replacing it again. Find the thermal fuse for your dryer in the search below.
How to test/replace thermal fuse – How to find model number
Flame Sensor – The flame sensor detects when the igniter is hot enough to ignite gas, when the igniter is hot enough to ignite gas it signals the valve coils to open allow gas to pass by the igniter. Usually when the the flame sensor is bad, it will cause the igniter to continue to constantly glow. The igniter should stop glowing after the gas has been ignited. Check the flame sensor for continuity. If it tests bad, replace it.
How to test/replace flame sensor – How to find model number
Cycling Thermostat/Operating Thermostat – Gas dryers also have a cycling thermostat. As stated above, the cycling thermostat isn’t as likely to go out as the above parts, but should still be tested for continuity. If your cycling thermostat has gone out, it could either be causing your dryer to to over heat or not produce enough heat.
How to test/replace thermostat – How to find model number
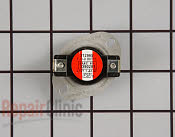
High-limit Thermostat – Just like the thermal fuse, the high limit thermostat most commonly blow when there is an air flow problem caused by lint build up in the dryer or in the venting. If your high limit thermostat doesn’t have continuity, it will need to be replaced.
How to test/replace high-limit thermostat – How to find model number
The following parts are less common causes of a dryer not heating, but after checking to be sure that your dryer is receiving the correct amount of voltage and testing all the parts above that are applicable to your dryer twice, and finding them all in working order, these would be the last parts to/replace. If you have to replace any of the following parts, you will want to evaluate whether you should attempt the repair or just replace your dryer due to the cost of the following parts.
Most new dryers have had timers replaced with control boards. The electro-mechanical timers were less likely to fail then their predecessors. These control boards are becoming more of a common cause of dryers not heating.
- Timer/Control board
- Motor
- Faulty wiring
For more detailed tutorials for your specific dryer, be sure to check out our tutorials and dryer repair manuals, or contact a trained appliance technician, by typing in your dryer question below.