
In order to replace your Whirlpool Gas Dryer Igniter you will need to follow the steps below. As with any repair you should unplug your appliance from the wall outlet.
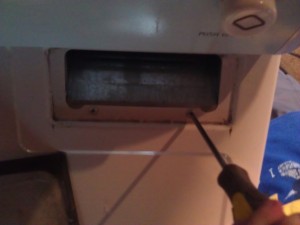
The first step is to move out the lint screen from its place and then remove the two screws near the opening.
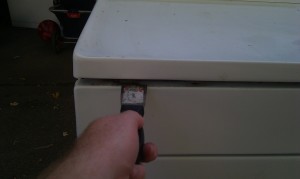
Next step is to put a putty knife under the cut of the main top to release the two spring clips and then rotate the top up.
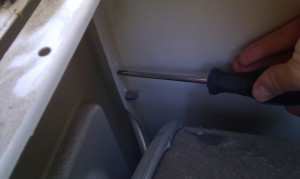
For the third step we will remove the front panel. Remember to disconnect the door switch wires before removing the front panel screws. I’ve found that slipping a small flat head screw driver between the two harnesses works best for me. Just be careful not to stab yourself in the hand. (I’ve done this a few times. ) ![]() After doing that lift the panel up and out with extreme caution because it is sharp.
After doing that lift the panel up and out with extreme caution because it is sharp.

Some Whirlpool Gas Dryer models include two front panels. In that case the procedure is to use a flat head screw driver to release the lower panel from the retaining clips, then remove the two springs (if applicable in your model) before releasing the second panel. To release the upper panel first one should loosen the two screws at the bottom of the upper panel and then lift the panel off.
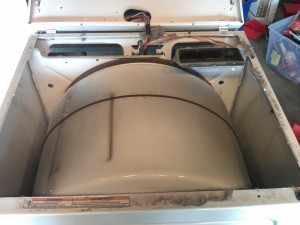
After lifting the panel you should depress the pulley at the bottom of the drum in order to release the belt tension and unthread the belt between the pulley and the motor shaft. You should use the belt to lift out the drum and be cautious there are sharp edges on the dryer and the drum can get a bit awkward.
This isn’t a Whirlpool dryer, but you can see the concept of the zigzag pattern used to thread the belt through the pulley to the motor.
This is also not a Whirlpool dryer, but this is exactly how you would remove the drum.
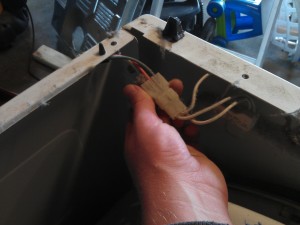
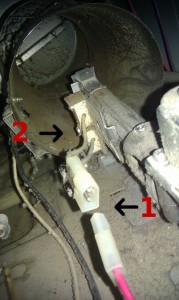
The Whirlpool Gas Dryer Igniter is located under the burner tube. In order to release the old igniter needing replacement you should disconnect the wires and loosen the mounting screws. The harness is labeled number 1 below. (The wire harness that connects to the igniter is very similar to the harness you removed from the door, disconnect in the same manner.) The screw that holds the igniter in place is labeled number 2 in the image below. It’s usually a 5/16 hex head screw.
When handling the new Whirlpool Gas Dryer Igniter you should be careful not to touch the element itself, carefully slide the new igniter into the slot and secure it with the mounting screws.
After you have replaced the igniter you need to reassemble the drier. Start by reconnecting the wire connector and replace the drum by aligning its rim by the two rollers. Afterwards insert the connection pulley into the slots in the base and loop the belt around the pulley and motor shaft in a zigzag formation. Rotate the drum to help align the belt. After replacing the drum in order you should replace the front panel. In case the model has one solid front panel you should line up your drum with the front panel seal and then align the slots with the retaining clips and press down the panel until locks into place. If your model has two panels you should first align the slots of the upper panel with the screws while lining up the drum, tighten the screws, if applicable reinstall the two springs and replace the lower panel by snapping it into position. At last reinstall the screws on top and reconnect the door switch wires. Rotate the main top back into place and press down on the front to secure the spring clips. Install the two screws in the lint screen opening and replace the lint screen. Plug the appliance back in to make sure the appliance is functioning properly.
Find the igniter for your dryer by inserting your model number below. If the igniter doesn’t fix your problem, you can return it within 365 days.
Find Your Part Number
For your convenience, here’s a video that shows you how to replace the igniter in a Whirlpool gas dryer.